

How To Repair Swimming Line
 Pool Plumbing leaks are ane part of pool maintenance that makes many puddle owners a little nervous, but making PVC plumbing repairs, or installing new or replacement equipment into the plumbing pipes is piece of cake.
PVC repair tools and materials are simple also, everything you need is at any hardware or home shop. We also have some common PVC fittings in our pool plumbing parts department.
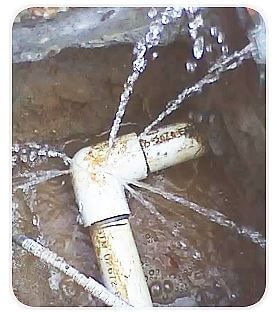
Making your own pool plumbing repairs can be a simple weekend project, keeping hundreds of dollars in your pocket! And despite the dramatic picture used hither, near leaks in puddle pipes are above the basis and easily accessible.
Fixing Pool Leaks:
Pool Leaks come in many forms. From the small drip, to the large gusher. For small drips, I'thousand often heard to say "It won't drain the pool!", and unless it's dripping onto the motor, or causing problems, the slow baste on a plumbing plumbing equipment or tiresome drip from the pump – won't amount to any noticeable water loss in the pool, and usually won't go whatsoever worse.
But larger pool plumbing leaks can cause problems and demand to be fixed, by replacing bad glue joints or cracked fittings – by cutting out the erstwhile and gluing in the new PVC pipe and fittings.
Suction Side Leaks
The suction side refers to all the plumbing Before the puddle pump impeller, which carries water nether suction or vacuum. This is the skimmer and principal bleed suction pipes, fittings and valves, which terminate in the front of the pump. A leak on the suction side will depict air into the pipes when the pump is on, and leak water out (usually) when the pump is off. The well-nigh common suction side problem is a shrunken fitting, the threaded PVC plumbing fixtures that screws into the front of the pump. So mutual that we've done a whole blog post on puddle pump fitting repair. Suction side leaks can be patched with pool putty or silicone for a temporary repair, but will usually demand to be cutting out and replaced with new pipe or fittings – for best results.
Suction side valves tin be cracked or damaged, or leaky – eventually needing replacement. But it tin be difficult to simply supercede one valve on the suction side, oft it'southward necessary to supplant the entire suction manifold, or most of the pipes from the ground up, into the pump. It may be because all of the Tees and xc's are bumped confronting each other, or additional PVC fittings from previous pipe and fitting repairs can make future repairs incommunicable.
Pressure Side Leaks
Afterward the impeller, the water flows under pressure, and whatever tiny cleft or void will leak water when the pump is running, and often when the pump is off too. Pool equipment (pump, filter, heater, chlorinator) can all leak water from time to fourth dimension, but today we are talking abou leaks on the plumbing or pipes and fittings that connect the pool and all of the pool equipment. The well-nigh common pool plumbing leaks on the pressure side are glue joints (where a pipage is glued to a fitting, like an MTA, 90°, 45° or coupling), or threaded joints, where PVC male and female connections are made.
Being under pressure, at that place is no manner to patch an inground pool plumbing leak on the pressure side. You can't wrap it with leak-stopping tape, and pouring epoxy over the area won't work either. Wrap information technology a hundred times with duct tape and you will dull the leak, but it's nonetheless gonna leak! Suction side leaks can be patched with pool putty, or other sealants on the outside of the pipe, considering the sealant is drawn into the fissure under suction. But force per unit area side pool leak repairs cannot be patched effectively from the outside (or from the inside!), and need to be cutting out and replaced.
Hush-hush Leaks
Pool pipes that are underground are not usually the cause of pool leaks, but they can be broken from freeze impairment, tree roots, settling decks or shifting soils. Flex pipage (Flexible PVC pipe) can be damaged past earwigs or chlorine, and is not recommended for underground utilise. Replacing cloak-and-dagger flex PVC pipe with rigid PVC pipe is a common repair on xxx year old pools, then common that nosotros've done a whole blog mail on flex piping skimmer repair.
If you lot are sure that the leak is secret, the side by side usual step is to force per unit area test the suspected line(due south), and then listen with specialized equipment, to make up one's mind the exact location of the leak. Alternatively, if the length of pipe run is very short, or if the entire pipe is desperately damaged, y'all can choose to replace the entire pipe and carelessness the quondam pipe, leaving it in the ground.
For pools with a curt pool deck apron (3-iv ft width), y'all may cull the selection of tunneling under the deck, every bit opposed to cutting the deck and digging. In a few hours of earthworks, you can have the skimmer pipes completely unearthed, or dig upwards where a return line meets the puddle wall. If you dig up enough clay under the deck to expose the underside, use heavy timbers cut to size, to support the pool deck. If you only expose one-ii feet of deck, you may not demand supports.
Alternatively, the other option is to cut the pool deck with a concrete saw, bust up the deck, dig out the clay and expose the leaking pipe or cracked pipe fitting. Either manner, it's a lot of dirty piece of work – but if you lot're up for information technology, read on.
How to Set up a Pool Leak
 Once a pool leak has been located and identified, either in a higher place ground or surreptitious, the next stride is to cut out the bad and replace with new. Earlier you suspension out the hacksaw or reciprocating saw to cut the pipe, make a solid program of attack. For complicated repairs, make a diagram to note all fittings and equipment. For simple fitting replacement you'll need enough room to be able to connect the new fitting to the pipe with a coupling. Make a solid plan of re-connection, before y'all beginning cutting the pipes.
When cutting the pipes, make a straight cutting, and so clean up the cut edge with sandpaper or emory textile. Recall to leave enough pipage to make a solid connection, virtually two inches.
Yous can pre-cut pipe sections, but it'southward more authentic to cutting the new PVC pipe pieces as you need them, so you lot can measure out again only before cutting. I add 1/two″ to my measures, because information technology's better to be too long than be too short! And although clichè to say, Measure Twice – Cut Once!
Apply PVC primer on piping and fittings about xxx seconds earlier adding copious amounts of fresh PVC mucilage. Primer cleans and softens the pipe, heating upwardly the plastic to make a solvent weld. Keep a rag handy to quickly wipe upward whatsoever drips of mucilage after you push button the pipe deep into the plumbing fixtures and hold it for 10 seconds.
When Gluing 90'due south and 45's , mucilage them in place with a length of PVC pipe inserted (dry fit, not glued) into the other side. This helps y'all to go the angle correct, for the verbal direction that the fitting needs to face.
For threaded male PVC fittings, smear a silicone sealant similar Blue RTV over the threads, and then wrap the threads several times with Teflon tape, in a clockwise direction (holding the threaded side of the fitting towards you). Tighten a threaded fitting in by hand, and so give information technology another 1 to 1-i/2 revolutions with large Aqueduct-Lok® type pliers.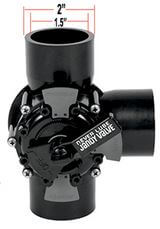
Sacrifices: In many cases, to replace a unproblematic fitting, yous may need to replace other fittings that are in the way of making a new connexion. Sometimes a cheque valve, Jandy valve or matrimony needs to be sacrificed, in order to replace a single leaking PVC fitting. Or you may need to reinstall the chlorinator or other puddle equipment plumbing.
Jandy valves can be saved, if you spend time with a hacksaw blade and minor screwdriver. When pipes are cut off right off against a valve, the glued pipage is still inside the valve port. Cut the inside pipe two-3 times with a hacksaw blade (blade only), and then use a sharp flathead and small-scale hammer to chip out the white PVC pipe, without gouging the valve. Another manner to save a Jandy Valve is to go over the outside with a 2in coupling, so reduce the coupling back downwards to 1.v inches with a reducer bushing.
The final connection that is made will be tight, and usually requires some bending of the pipes, or pushing of the equipment, to make the concluding glue joint connexion. Pipes and equipment always have an inch or 2 of play in them, so don't be agape to push and pull as needed, to make the final gum joint.
OTHER Pool PLUMBING REPAIR TIPS
- Don't reduce PVC piping size with inserts or sleeves.
- Utilize as few fittings as possible, avoid pipe turns.
- Utilise Fresh medium or heavy body PVC gum.
- Water and Glue don't mix! Always glue Dry out pipes and fittings.
- Apply schedule 40, deep socket fittings, for pressure applications.
- For pool plumbing parts not found at a Hardware store, visit a Plumbing supplier.
- Don't apply flex PVC pipe underground!

How To Repair Swimming Line,
Source: https://blog.intheswim.com/swimming-pool-plumbing-leak-repair/
Posted by: lunasearly1971.blogspot.com
0 Response to "How To Repair Swimming Line"
Post a Comment